Anatomy of the venturi burner kit and flame adjustment instructions
*Use caution when operating this system! Working with a live flame and a propane burning system can be dangerous. Know the risks and be prepared.
Keep a hose and fire extinguiser close by at all times. Do not be caught unprepared.
If you are not comfortable operating this system, stop and seek professional assistance. Always follow all local laws and regulations.*
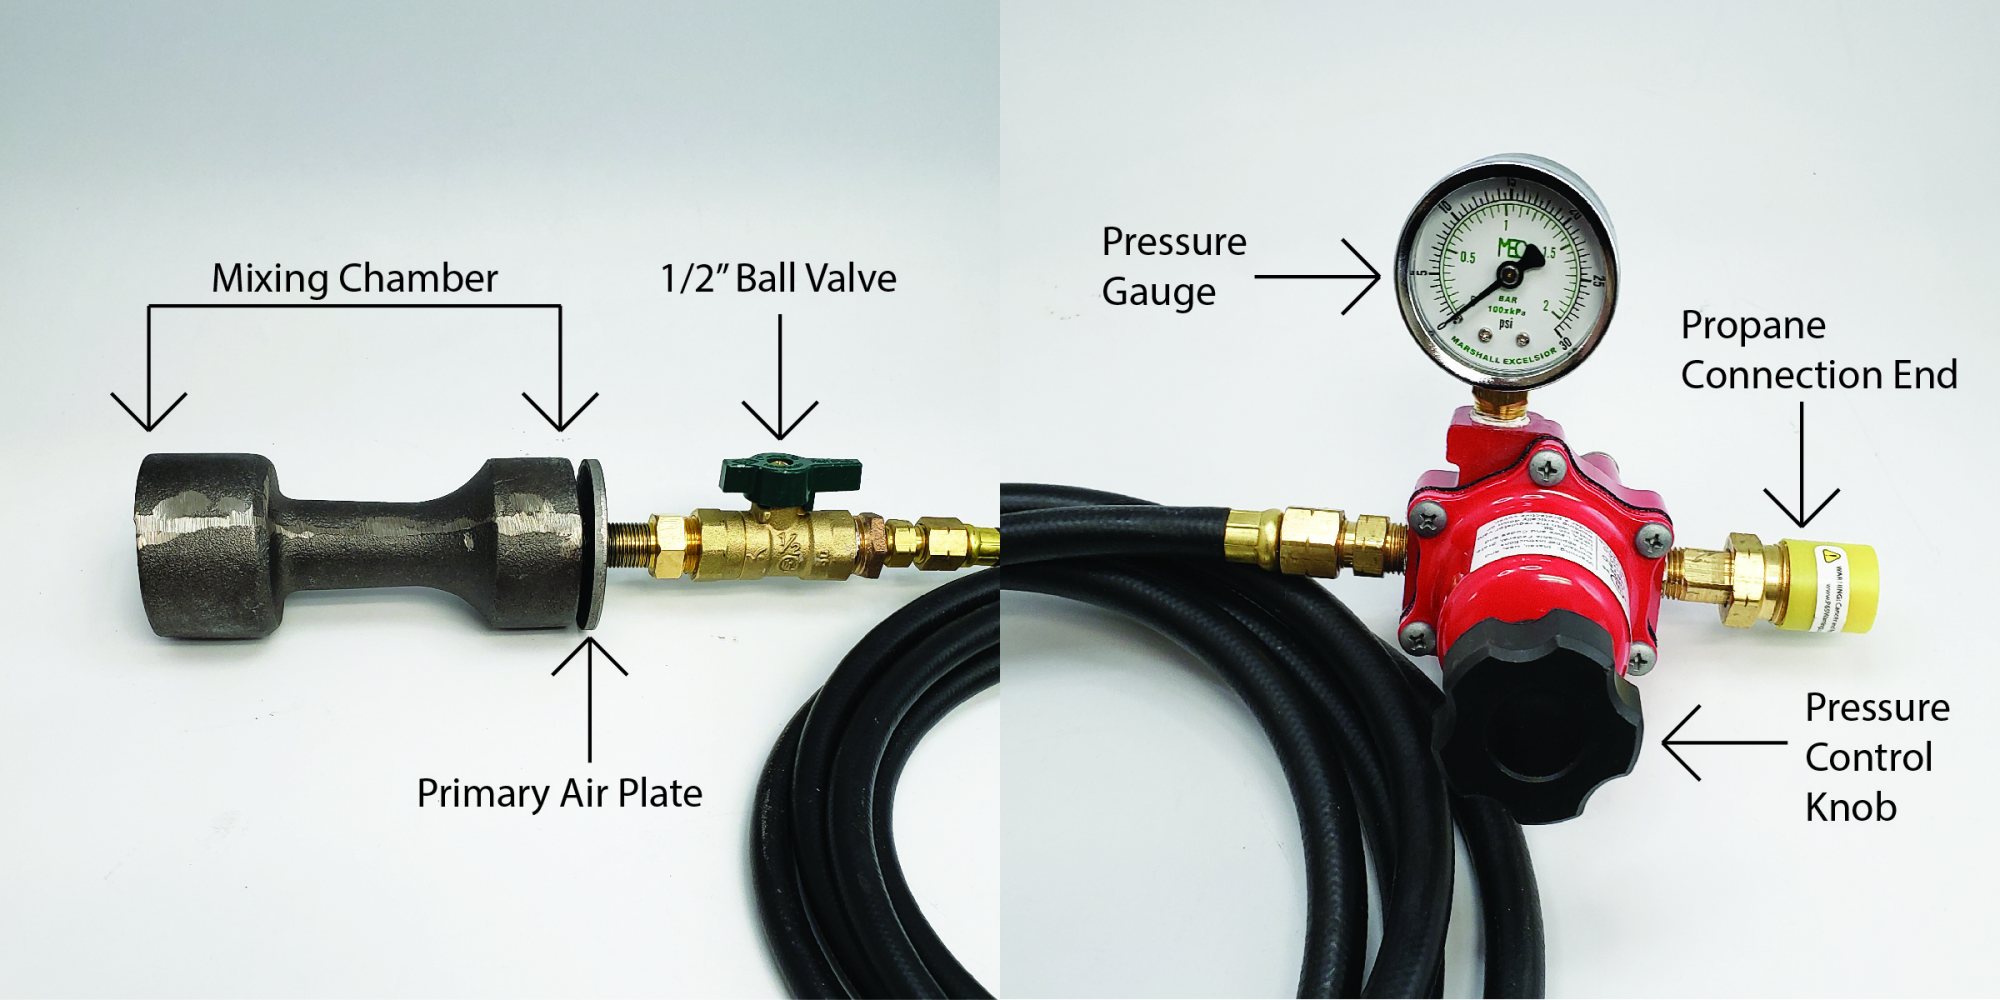
Mixing Chamber: This is where the venturi effect happens that gives this burner its name! The force of the pressurized gas pulls air into the mixing chamber and is ignited on the other end.
Primary Air Plate: This plate controls how much air gets mixed with the gas which will determine how efficient the flame will be. An efficient flame will burn all the combustible material while an inefficient flame will expel unburned fuel, usually in the form of carbon. Reduction firing takes advantage of this effect to introduce carbon and "reduce" the amount of available oxygen that would normally bond with the oxides that give glazes their specific hues.
1/2" Ball Valve: This controls how much gas is mixed with the air and should be adjusted in tandem with the air intake plate to determine efficiency of the flame.
Pressure Gauge: This displays how much pressure the gas under that is being sent to the burner. Measured in inches of water column and PSI, the pressure will determine the BTU output of the burner. (See the chart below for comparisons)
Pressure Control Knob: This knob sets the pressure of the gas that the regulator sends to the burner. For Raku, a baseline of 3psi is a good place to start and anything beyond 10psi will begin to reduce with this particular burner design.
Propane Connection End: Remove the plastic covering to reveal the threaded connection that will fit to your propane tank. Keep these threads clean for a tight and leak-free connection to the tank. This system is for propane which is called liquid propane or LP for short. Propane tanks use reverse threads: to tighten turn the connector counter-clockwise, and to loosen turn it clockwise.
BTUs/LP (#38 Orifice)
| 11" wc | 2psi | 3psi | 4psi | 5psi | 10psi | 15psi | 20psi |
| 77,400 btu | 76,880 btu | 94,500 btu | 109,250 btu | 122,100 btu | 171,910 btu | 210,555 btu | 243,130 btu |
How to light the burner:
1. Shut the 1/2" ball valve on the gas line near the burner. (Ball valves are in the off position when they are 90° to the gas line.)
2. Open the primary air plate by spinning it along the threads to move it away from the mixing chamber.
3. Using a long match or extension lighter, hold a flame to the front tip of the burner and slowly open the ball valve. (DO NOT use small matches or a small lighter! Keep your distance from the burner end when lighting. If you do not have a long match or extension lighter you can roll up a piece of paper and light the end.)
4. Adjust the gas ball valve and the primary air plate to the appropriate ratio of air to gas. Oxidized flames are blue while reduced flames are orange. (If you cannot achieve a balanced flame from adjusting only the air plate and the gas valve, you may need to increase the pressure on the regulator.)
5. Adjust the pressure on the regulator to the desired pressure and BTU output.
Notes:
When shutting off the burner, start with the gas ball valve before shutting off the tank itself.
To increase the life of the regulator, reduce the pressure before storing.
If your tank starts to get frosty on the outside, that means it is losing too much propane for the tank size. If you experience this you should increase your tank size or plumb multiple tanks together.
For raku firing, you may not need to adjust the burner once everything is adjusted. You don't need to increase the pressure or gas, but rather wait for the kiln to build up heat.
It is best to adjust your settings before you load the kiln with the work you intend to fire to make sure your flame will be moving well through the kiln.
Kiln shelves, soft or hard bricks, and other refractory material can be used to direct the flame as it enters the kiln to help disribute it. You don't want the flame to go in and straight out the top!
Make the flame work for you! You might need to adjust the gas and air ratio to make sure you have a long enough (or short enough) flame to fit the size of kiln you are firing.