
)
The Ceramic Shop
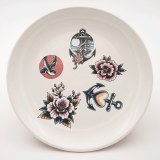
Custom Decal - Color - Large
$30.00
Item #: CustomDecalC8x11-
Custom Decals from The Ceramic Shop
Are you looking to add a more personalized touch to your pottery? Have a commision for a coffee shop or brewery? Need a picture on a pot? The Ceramic Shop's Custom Overglaze Decals have you covered! While they may sound intimidating, they are easy and fun to use, and are a great way to customize your work. We offer the full color spectrum and full greyscale, as well as several different sizes depending on what you need. Not too tech savvy? Need help setting up a file? We also offer several design service options to help set up any file you need! Keep on reading our guide her for a full breakdown of Custom Decals by The Ceramic Shop.
Only our Extra Large Sheet option offers the choice of food-safe or non-food-safe ink. All other sizes are printed with food-safe ink exclusively.
What are Ceramic Decals?
Our Custom Overglaze Ceramic Decals are digitally printed decals that are intended to be applied to a glazed ceramic surface. Once applied they can be fired to be permanently adhered to a ceramic surface. We offer several different sizes to fit your needs:
Small - 4" x 5"
Medium - 8" x 5"
Large - 8" x 10.5"
Extra Large Sheet* - 10.25" x 15.75"
How do ceramic decals work?
Overglaze decals function exactly like a temporary tattoo, but are permanently fired to your ceramics. After we print the file you send us, soak the sheet in warm water, separate the decal from the backing, and apply it to your piece. After letting your decal dry, kiln fire your decal with our easy 2 step firing schedule. Please keep in mind that our custom digital decals are overglaze decals. This means they must be applied to ceramics that have already been glazed. The fun part about this is that you can apply these to virtually ANY fired ceramic surface – think vintage thrift-store mugs or old china you found in your basement or off-the-shelf dishware from any home goods store. These decals will only work as overglaze decals for a few reasons; the slick surface of fired gloss glaze makes a great surface for the decals to adhere to, and the decals get fired to an overall temperature that is much lower that the ranges that both bisqueware and any glaze – low-fire included – so if the decal process is followed with a glaze firing, it will be hot enough to burn them out.
How do I set up and send my file?
We accept a wide variety of files! You can send us a JPG, PNG, AI, PSD, PDF, TIFF, etc. Please email your files to CustomDecals@theceramicshop.com. If you are setting up your own files, we request that they be set up to the sheet size you are ordering. If you are ordering a Large 8" x 10.5" sheet, you can use the whole 8" x 10.5" area for your designs. Need help setting up your sheet? We have over 15+ years of graphic design knowledge and experience to help you set up your file, as we offer several design service options, starting at an affordable $5 quick layout fee. Please email us for a design time quote!
How do I order?
First email us your file! We will make sure everything is set up to print, or inform how to fix your file or recommend which design service option to purchase. Select the sheet size you need, if you are purchasing black only or full color, and if you need design/layout help. Email us at CustomDecals@theceramicshop.com if you are unsure how to order.
How do I apply my decals to my glazed surface?
Prepare for application – we recommend setting up a space with the following items:
1. Your decals, cut up and ready for application
2. A bowl of warm/room-temperature water
3. A rubber rib or sponge, or something firm and flexible that can act as a squeegee – here at The Ceramic Shop, we really like using this red rib by MudTools.
4. A towel/sponge to clean up water drips from your ceramic piece.
Once you have all of those elements assembled, you are ready to apply your decal! First clean and dry your surface so that there is no dust or any particles on your surface. Soak each decal in water one at a time until the decal starts to slide away from the backing; this takes about 30 seconds. Very carefully, without folding your decal, place the decal on the clean, dry surface of your ceramic piece. You will notice that you will be able to gently slide it around and position it.
Once your decal has been placed where you wish it, take your rubber rib and, working from the center outward, squeeze out the water and air that is trapped between the decal and the ceramic piece. Soak up the water as you go.
That’s it – that’s all there is to applying your decal! At this point, we suggest waiting 24 hours for your piece to dry completely before you proceed with the firing. Firing wet decals can contribute to pinholing, or to water marks being visible on your finished work, so allowing your pieces the time to thoroughly dry can make a big difference.
How do I fire my decals?
Here is our easy 2 step kiln firing schedule:
1. 350F per hour up to 788F - no soak/hold.
2. 400F per hour up to 1616F - 30 minute soak/hold.
*If you are firing in a manual kiln we suggest firing on the lowest heat rise to cone 018-016.*
Some notes about colors:
Please keep in mind when creating a decal layout – we cannot guarantee that your fired colors will be as bright as the colors that you see on your computer screen (which is yet another reason that we suggest testing). Although our printing process does aim to keep colors as consistent as possible, there are many factors at play here. If you send us a decal with fluorescent green details, keep in mind your end result will still be green – just more muted. The fired results here are created by chemical reactions obtained through firing, not by simply printing fixed ink colors. They will look different on the printed sheet, don’t be alarmed! Expect a slight degree of color variation, especially with bright colors. Additionally, please keep in mind that there may be chemical factors beyond our control when it comes to the ceramic pieces you place the decals upon - for instance, the presence of zinc in the glazes of your ceramic pieces can greatly affect the end color result of your decals. We ALWAYS recommended testing one decal before firing your entire order.
Please also note that our decals do have certain limitations -- we cannot print metallic tones or lusters and we cannot print opaque white. Digitally printed decals on a white (or light-colored) surface, and they are slightly translucent. When you send us an image with white in it, please note that the printing process reads that as clear. Decals work best on white or light-colored ceramic; they are slightly translucent, so they may not show up very well on darker pieces.
Some notes about preparing your file:
Start your setup by creating a file in any graphics editing program with the dimensions of the decal size you are ordering(Small at 4" x 5", Medium at 8" x 5", etc.). The resolution (dpi, or ‘dots per inch) should be at least 300; you can go up to 600 here. Basically, you don’t want your decal to appear pixelated, so 300 dpi is the minimum suggested resolution at which the human eye can no longer see individual pixels.
Your color profile is also very important when you set up your document. You want to make sure that you embed a CMYK profile, because that is the color profile necessary for printed materials. When you set up your document, you may have the option to embed an RGB profile – do NOT do that, as that is the color profile that is specific to web-only colors.
We recommend sending us the highest quality PDF possible for print, but accept the following files: JPG, PNG, AI, PSD, PDF, and TIFF. If working with specific fonts in Illustrator you must CREATE OUTLINES or vectorize all fonts in your file, this saves your font as vector shapes and will assure your files will print correctly. When you place your order online, simply send the artwork to CustomDecals@theceramicshop.com. For large files, we accept Google Drive invitations, DropBox WeTransfer, and most other file transfer services.
If you are unable to complete a layout yourself, or if you are in need of some graphic design help, or photo retouching, we’re happy to help you! Email project requests to CustomDecals@theceramicshop.com. We offer everything from an affordable $5 quick layout to an hourly charged full design service. Just send us an email if you are unsure how long it will take us to complete.
Creating a testing area:
With all ceramic processes, we always suggest testing before you enter full-on production. With digital custom decals, you can make a test strip for firing somewhere on your decal layout. You can do this without taking up much space on your sheet; just make a thin strip of color blocks that feature colors from your design (or, if you are ordering a black-only decal, a greyscale). Testing with this strip will help you to zero in on the perfect firing program.
*Extra Large Custom Decals - 10.25” x 15.75” have an extended lead time of up to 20 business days and have a more complex firing method.
1. 80F per hour up to 250F - 20 minute soak/hold.
2. 250F per hour up to 700F - 15 minute soak/hold.
2. 1000F per hour up to 1470F - 15 minute soak/hold.
The Ceramic Shop reserves the right to use its sole discretion in refusing to print anything it deems inappropriate or known to be illegal. The Ceramic Shop is not liable for any damages resulting from unwitting violation of copyright laws or illegal use of trade names or slogans. The client guarantees the legal title of all matters submitted to The Ceramic Shop for printing and/or publication. Custom decals are made to order and cannot be refunded or returned.